Posted on 09 Sep 2014
This is a handy techinique when used in conjuction with the previous week’s tip with separate builds per release type.
To override the application name (and any other resource really), create a new folder under app/src that matches your release name. In this case we’ll be overriding the debug release, so app/src/debug.
Once you have that simply create the same folder structure that is inside app/src/main for overrides. For overriding strings we’ll create app/src/debug/res/values.
Inside the new values folder create strings.xml and add the new app_name value.
app/src/debug/res/values/strings.xml
<?xml version="1.0" encoding="utf-8"?>
<resources>

  <string name="app_name">MyApp Debug</string>

</resources>
Now when you install the new debug only application it will have a new name to distinguish between the various release types!
Posted on 02 Sep 2014
Being able to have the same application installed for both development and the release version is very handy. It lets you always have a stable version of the app installed.
app/build.gradle
android {
  // ...

  buildTypes {
    debug {
      // ...
      applicationIdSuffix ".dev"
    }
  }

  // ...
Posted on 25 Aug 2014
For SmartChat we used SQS. We used this as a way of sending messages for background workers instead of Sidekiq or Resque. This worked well, but for local development having to use AWS resources wasn’t ideal. We set about creating a way of using Redis instead.
The SQS interface that we used was very simple. It has two methods that were used, #send_messsage and #poll. With this we can make a redis version.
redis_queue.rb
require 'redis'

RedisMessage = Struct.new(:body)

class RedisQueue
  def initialize(redis)
    @redis = redis
  end

  def poll(&block)
    loop do
      queue, message = @redis.brpop("smartchat-queue")
      # queue could be nil if a timeout happened
      if queue
        block.call(RedisMessage.new(message))
      end
    end
  end

  def send_message(message_json)
    @redis.lpush("smartchat-queue", message_json)
  end
end
To use this, we have a AppContainer switch to it for development purposes and use it normally.
config/initializers/app_container.rb
#...
let(:queue) do
  if Rails.env.development? || Rails.env.all?
    require 'redis_queue'
    RedisQueue.new(redis)
  else
    AWS::SQS.new.queues.named(sqs_queue_name)
  end
end
#...
libexec/smartchat-daemon.rb
AppContainer.queue.poll do |msg|
  body = JSON.parse(msg.body)

  # do work
end
Posted on 11 Aug 2014
Forgetting to change your Android application’s API endpoint when publishing to the Play Store is something I did at least three times when building SmartChat. They were all caught quickly and it was only an alpha app, so it wasn’t ever a big issue. However, this is something I would like to avoid.
I searched a bit and found that you could set BuildConfig variables per release type. This lets you never forget to change it again.
MyProject/build.gradle
android {
  buildTypes {
    debug {
      buildConfigField "String", "API_URL", "\"http://192.168.1.2:5000/\""
    }

    release {
      buildConfigField "String", "API_URL", "\"http://example.com/\""
    }
  }
}
With this setup you can access your API endpoint via BuildConfig.API_URL. This will be set at build time and you won’t accidentally forget to change it back when building for the Play Store.
I also found being able to set it different during development was handy so I ended up with this method in my API client.
public String getRootURL() {
  if (BuildConfig.DEBUG) {
    // Change me to whatever you want, this will only matter in development
    return BuildConfig.API_URL;
  }
  return BuildConfig.API_URL;
}
Posted on 04 Aug 2014
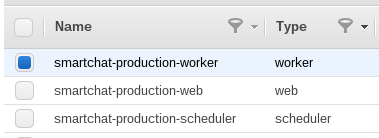
For SmartChat we were deploying on EC2. There were three types of serveers to deploy and I used EC2 tags and capistrano to deploy to each server correctly without having to hardcode any of the servers.
Here is my EC2 console with a custom Type key.

In the deploy script for production we can now use the AWS SDK to pull your instances down and deploy to them correctly.
Dotenv is used because AWS keys are stored in .env and capistrano won’t load that normally.
config/deploy/production.md
require 'aws-sdk'
require 'dotenv'
Dotenv.load

set :rails_env, "production"

primary = true

ec2 = AWS::EC2.new
ec2.instances.tagged("Type").tagged_values("web").each do |instance|
  next unless instance.status == :running

  # We only want one application server migrating the database
  server instance.public_dns_name, :web, :app, :db, :primary => primary

  primary = false
end

ec2.instances.tagged("Type").tagged_values("worker").each do |instance|
  next unless instance.status == :running
  server instance.public_dns_name, :worker, :app
end

ec2.instances.tagged("Type").tagged_values("scheduler").each do |instance|
  next unless instance.status == :running
  server instance.public_dns_name, :scheduler, :app
end

