Posted on 29 Dec 2014
The last post was about logging workers/jobs as they happened in a manual process. From that I created a small gem that handles most of this for you. LoggingWorker is the gem. It’s not up on rubygems yet, so you’ll need to install it via git or github in bundler.
Gemfile
gem 'logging_worker', :github => "smartlogic/logging_worker"
Once it’s installed you’ll need create the migrations.
$ rake logging_worker_engine:install:migrations
$ rake db:migrate db:test:prepare
To have workers start logging, you need to prepend the module in each worker. prepend is very important because the #perform method needs to be the LoggingWorker::Worker#perform.
Once this is done, everything is taken care of for you. You can continue to enhance your workers though. In one project I have it associate job runs to an object. To do this you need to set a custom JobRun class.
class ImportantWorker
  include Sidekiq::Worker
  prepend LoggingWorker::Worker

  sidekiq_options({
    :job_run_class => ::JobRun
  })

  def perform(order_id)
    order = Order.find(order_id)
    job_run.order = order
  end
end
class JobRun < LoggingWorker::JobRun
  belongs_to :order
end
You can also use the logger as the worker does its work. The log is saved inside the JobRun record.
class ImportantWorker
  include Sidekiq::Worker
  prepend LoggingWorker::Worker

  def perform(order_id)
    order = Order.find(order_id)
    logger.info "Found the order, starting work..."
  end
end
If an error is raised it is captured, saved, and then reraised to let sidekiq perform it again.
Below is the full schema that comes with the JobRun class from the gem.
db/schema.rb
create_table "job_runs", force: true do |t|
  t.string   "worker_class"
  t.string   "arguments",       array: true
  t.boolean  "successful"
  t.datetime "completed_at"
  t.text     "log"
  t.text     "error_class"
  t.text     "error_message"
  t.text     "error_backtrace", array: true
  t.datetime "created_at"
  t.datetime "updated_at"
end
Posted on 10 Dec 2014
One of the projects I’m working on now does thousands of background jobs a day. It uses sidekiq and handles errors fairly well by letting them retry normally. This works great in a staging environment as you know more or less what is happening all the time.
Once we got this into production we quickly found out we needed better insight into what the system was doing all the time. For this I came up with idea to log each job as it’s happening, fairly automatically.
When a job starts it immediately creates a JobRun which logs the start time, worker class, and the arguments passed in. It has an ensure block to always make sure it saves the finish time of a job, even if it wasn’t successful.
Below is the general layout of our worker classes.
class MyWorker < AppWorker
  include Sidekiq::Worker

  def perform(arg1, arg2)
    start_perform!(arg1, arg2)

    # do work

    successful!
  ensure
    finish_perform!
  end
end
The app has an admin panel that lets us easily view each job run as it’s happening. This way you can see and have a record of what the system did and how many times a job failed.
A few additions in the future I want to look into is having each job have a log. So as the worker is doing it’s job it will save into a text column that we can look at after it’s done to see exactly what happened. It would be good to be able to tie a JobRun between retries as well. So if a job failed we could link to the next run of that exact job.
Posted on 01 Dec 2014
This is a fairly simple pager I wrote for a project recently. It’s not the exact one as it needed more features that a generic pager doesn’t. This should cover most cases pretty nicely.
One good feature about this is that it yields items as it goes instead of collecting them up for the end. This lets you do work in-between requests hopefully spacing them out a bit, and not completely slamming the service you’re paging from.
I also like that you can completely ignore the HTTP interactions and just deal with regular ruby Enumerable methods.
class Pager < Struct.new(:client, :path, :json_key)
  include Enumerable

  def each
    fetch(1) do |item|
      yield item
    end
  end

  private

  def fetch(page_number, &block)
    response = client.get(path) do |req|
      req.params["page"] = page_number
    end
    items = JSON.parse(response.body).fetch(json_key, [])
    items.each do |item|
      yield item
    end
    if items.count > 0
      fetch(page_number + 1, &block)
    end
  end
end
Posted on 04 Nov 2014
I wanted a way to upload screenshots quickly to something I had control of. This is a small script that I placed in my PATH and the XFCE launcher. It uploads to S3 and auto deletes after a week.
Setting up S3
Create a bucket with the same name as your domain, e.g. img.example.com. Create a CNAME for img.example.com to img.example.com..s3.amazonaws.com..
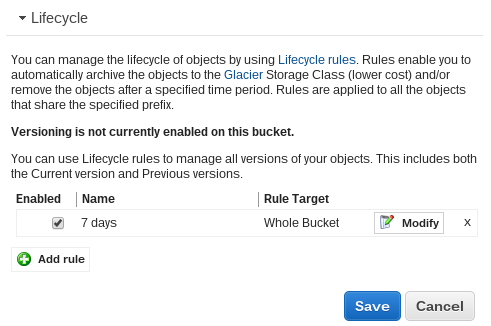
To have photos automatically deleted after 7 days open the S3 properties for the bucket. Expand the lifecycle tab and add a rule. Select the whole bucket and permanently delete after 7 days.
S3 properties

Place the following script in a folder in your PATH. I have ~/bin in my path for such a case. You will need to change the HOST, access_key_id, and secret_access_key.
upload.rb
#!/usr/bin/env ruby

require 'aws-sdk'
require 'securerandom'
require 'clipboard'
require 'uri'

HOST = "img.example.com"

AWS.config({
  :access_key_id => '...',
  :secret_access_key => '...',
})

if ARGV.length == 0
  puts "Please run with a file"
  sleep 5
  exit
end

s3 = AWS::S3.new
bucket = s3.buckets[HOST]

# So many different ways because when you drop an image on a
# launcher for XFCE it adds `file://` in front of it.
if ARGV[0] =~ /file:\/\//
  file = URI.decode(URI.parse(ARGV[0]).path)
elsif ARGV[0] =~ /\A\//
  file = Pathname.new(ARGV[0])
else
  file = File.join(Dir.pwd, ARGV[0])
end

file_name = "#{SecureRandom.uuid}#{File.extname(file)}"

object = bucket.objects[file_name]
object.write(File.read(file), {
  :acl => :public_read,
  :reduced_redundancy => true
})

url = "http://#{HOST}/#{file_name}"

Clipboard.copy url
puts url

sleep 5
Posted on 30 Oct 2014
This post was originally published on the
SmartLogic Blog.

I bookmarked links from RESTFest this weekend; check them out below for resources, upcoming events, and more. Feel free to add anything I missed in the comments!
Follow @smartlogic on Twitter for more like this.


